Care and Hygiene Instructions for Scleral Rigid Gas Permeable Contact Lenses
Preparations Before Inserting Your Scleral Contact Lens
1. Always wash your hands with a lanolin/glycerin-free soap before handling your contact lenses
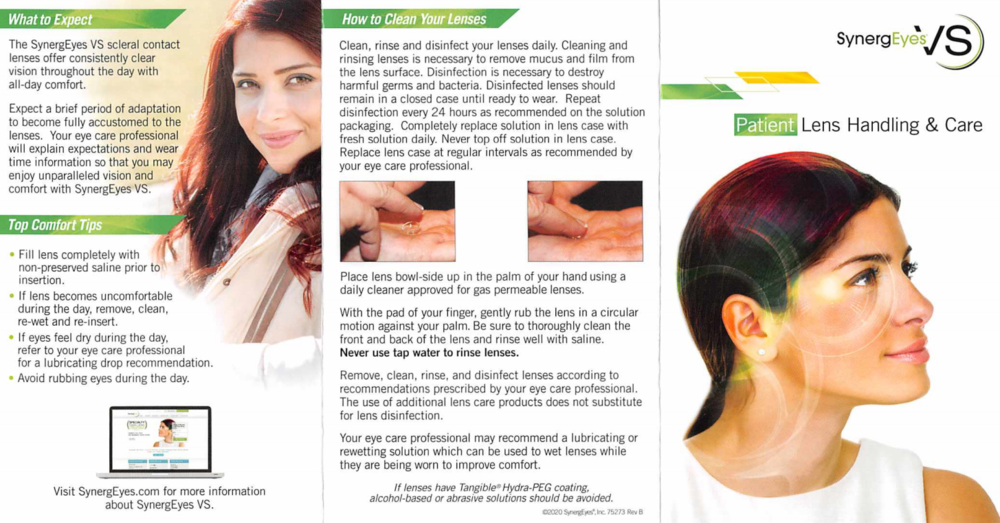
2. Before you insert a scleral contact lens, first condition the lens with several drops of Boston Simplus Solution by gently rubbing the solution on both the outside and the inside surface of the contact lens. Rinse the Boston Simplus Solution off of the contact lens with Unisol (unpreserved) Saline Solution. Do not rinse the contact lens with tap water.
3. After rinsing the scleral contact lens with Unisol Solution, place the contact lens upon the large contact lens applicator or the tips of your fingers, and fill the inside of the contact lens with Unisol until it looks like the saline will run off the sides of the contact lens. Too much saline gets you wet. Too little saline results in air bubbles between the back surface of the contact lens and the cornea after application of the contact lens to the eye. Air bubbles between the contact lens and the cornea cause lens discomfort and blurred vision.
Hygiene Instructions After Removal
1. Always wash your hands with a lanolin/glycerin-free soap before handling your contact lenses
2. When you remove a scleral contact lens from the eye, first condition the lens with several drops of Boston Simplus Solution by gently rubbing the solution on both the outside and the inside surface of the contact lens. Rinse the Boston Simplus Solution off of the contact lens with Unisol (unpreserved) Saline Solution. Do not rinse the contact lens with tap water.
3. You must now disinfect and store your contact lenses for the night. For disinfection and storage of your contact lens, you will use Clear Care Solution. In your Clear Care Kit, you will find a small plastic storage container that has a marker line inscribed on the surface of the container. You will fill up the storage container with Clear Care Solution until you reach the marker line. The top of the container has two baskets for the storage of your respective contact lenses. Either both sides or only one side of the container top will be marked with a letter, usually an R for the right contact lens. Place your scleral contact lenses into the correct storage basket and then screw the top onto the storage container. You will see the Clear Care solution begin to bubble as the disinfection process begins.
4. Allow your scleral contact lenses to be stored & disinfected for at least 6 hours for the disinfection process to be completed. Do not insert your contact lenses any sooner than 6 to 8 hours after initiating the disinfection procedure as this may cause irritation or burning of the eyes.
5. Clear Care is 3% Hydrogen Peroxide and as such, can cause irritation and mild injury when applied directly to the eye. Keep your Clear Care Kit in a completely separate area from your conditioning solution and your saline solution. Do not make the mistake of using your Clear Care Solution on your contact lenses to insert the lenses onto your eyes.
Insertion of your Scleral Contact Lens
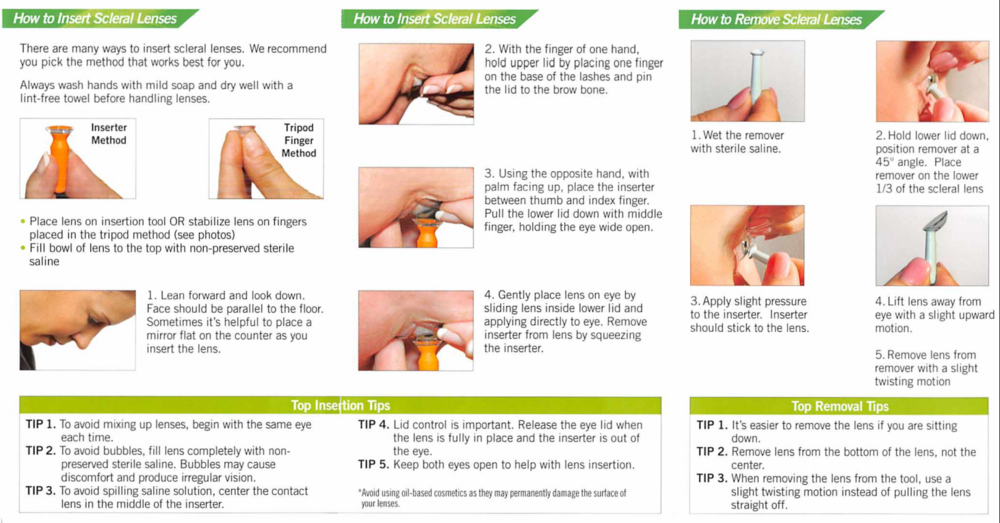
1. Place yourself in a position to successfully apply your scleral contact lens to the eye. Take a small portable mirror and place it on a flat surface in front of you. Do not lean in the mirror. It should be placed flat on a surface such as a table or counter. When applying your scleral contact lens, you must lean or bend over until your face is parallel to the surface of the mirror. Tuck your chin in towards your chest if this will help you position your face parallel to the surface of the mirror.
2. Place your right scleral contact lens upon the large applicator. Hold the applicator in your left hand. You may also create a tripod using your thumb, index, and middle finger to support the contact lens upon your left fingers.
3. Using your right index finger and right thumb, grab onto your upper and lower right eyelids and spread the eyelids as far apart as possible. With the right eyelids spread far apart, using your left fingers or the contact lens applicator held in your left hand, bring the scleral contact lens up towards your right eye, and with moderate pressure apply the scleral lens to your right eye. If you are using an applicator, do not forget to squeeze the applicator to release the contact lens into the eye.
4. To insert your left scleral contact lens, the procedure is the same but you will hold the contact lens with your right hand and separate your upper and lower left eyelids using your left hand.
5. Be patient and take your time. It is not unusual to have to attempt contact lens insertion several times before achieving the desired result.
Removal of your Scleral Contact Lens
1. Place yourself in a position to successfully apply your scleral contact lens to the eye. Take a small portable mirror and place it on a flat surface in front of you. Do not lean in the mirror. It should be placed flat on a surface such as a table or counter. When applying your scleral contact lens, you must lean or bend over until your face is parallel to the surface of the mirror. Tuck your chin in towards your chest if this will help you position your face parallel to the surface of the mirror.
2. Remove your right scleral contact lens first. Use your right thumb and middle finger to grip and separate your right upper and lower eyelid as much as possible.
3. Hold the lens removal tool between the thumb and index finger of your left hand.
4. With your right eyelids spread as far apart as possible, apply the lens removal tool to the surface of your scleral contact lens approximately 2/3 the distance between the center and the edge of your scleral contact lens, and apply some pressure upon the lens. This will create a suction effect.
5. Gently pull on the lens removal tool and you should feel the scleral contact lens being released from the eye.
6. Do not try to remove your scleral contact lens by placing the removal tool directly upon the center of the contact lens. You will not be able to break the suction between the contact lens and the surface of the eye in this position.
7. Be patient and take your time. It is not unusual to have to attempt contact lens removal several times before achieving the desired result.


